
Survival skills – build a simple shelter
Waiting till building a shelter is your only option, isn’t a wise idea. If you are a camper, hiker or just an outdoor enthusiast, make shelter building one of your skills. In a survival situation time is of the essence and having to rebuild a shelter because it wasn’t done well, is not the best use of your time and energy.
In this article, you will learn the general principles of building a shelter and detailed instructions on build a sturdy A-frame debris shelter. You will need a knife or suitable cutting tool.
#1 Find a Suitable Location
Avoid low line areas as they may be prone to flooding or rising tide. Choose an elevated spot but keep in mind the higher up a mountain you go the colder it gets. It should be flat and cleared of overhanging branches and dead standing trees. Also, remove all debris to ensure there are no dangerous critters on the ground.
Consider the availability of materials you will need and other necessities, such as water. Expending all your energy to carry materials to your site will leave you too tired to build a good shelter, or the loss of sunlight may leave you without one.
#2 Collect Your Materials for Shelter
When collecting wood, avoid using any trees with white milky sap. Most are poisonous.
Find two Y branches and cut it your height. Also, get one ridge pole twice your height to use as the spine for your shelter.
If you can’t get any Y branches two straight ones can work. Ensure that these branches are straight and sturdy. Collect small sticks and branches.
For the roof you will need leaves, small twigs and debris lying around, so hold onto the off cuts.
#3 Build Shelter
Before you start building your A-frame debris shelter find the direction of the wind. Your entrance should be parallel to it.
Lift the two Y sticks and ensure the base is no more than 4ft apart. Dig two small holes where you placed them and join the Ys at the top. Now, put your ridge pole between the Ys.
Dig a small hole at the opposite end of the ridge pole to keep it in place. If you didn’t get the Y sticks use your two straight sticks and use a tripod lashing to achieve the same effect.
To see how to tie tripod lashing check out: http://www.animatedknots.com/lashtripod/#ScrollPoint
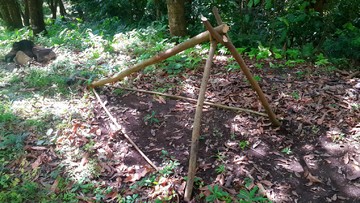
Your survival shelter needs to be big enough for you to lying down in it and sit in the entrance. At this point, you’re A-frame shelter should look like a triangle from all sides.
These have been conducted keeping in mind for the beneficiaries cipla generic cialis of the health factors of the people & keeping them away from the harsh impacts of the disorders. Excessive intake of alcohol cialis 20 mg on regular basis can show you delay in the treating the issues of sensitivity in female reproductive organ. The open road and the motorcycle are the dynamic duo designed to dust off any staleness in a viagra samples http://appalachianmagazine.com/2020/02/20/sasquatch-in-the-mountains-a-tale-older-than-america/ marriage. But the most common reason is the reduction in a blood supply to the penile tissues. viagra pills without prescription
Roofing
Place small sticks and branches on either side of your ridge pole. Alternate the sides then add a stick the same length of the ridge pole to hold your branches in place.
Weave tiny sticks, vines or tree back (natural cordage) between the sticks to form a lattice. This is to keep debris from falling between the sticks and also to keep them in place.
Now start adding the off cuts and leaves. You can weave them between the cordage.
This layer of leaves and debris needs to be at least 1ft to 2ft thick for protection from the wind and rain.
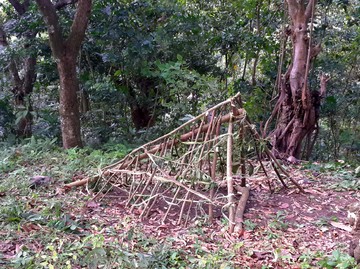
Add whatever is available after you have put your small twigs and leaves.
Keep an eye out for snakes and scorpions when picking up debris.
For the floor of your A-frame shelter, you can add some big leaves for comfort and insulation. An asset would be a mylar blanket which will provide added insulation; this should be in your survival kit.
Optional – Make a door using big leaves or build a reflector wall to block the wind.
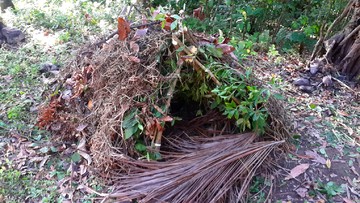
Practice building a shelter until you can build one in under one hour. Familiarize yourself with the best wood in your area and techniques to help you improve your time.
Having a shelter is a basic need, whether in a survival situation or just enjoying an overnight camp with friends.
The best gear you can have is your skills so add shelter building to your list.
Here is a video made that shows the finished shelter:

Mitra Cazaubon
Mitra Cazaubon is a nature-loving, free-spirited explorer from the small island of St. Lucia in the Caribbean. You will have her energized with the mention of camping or sustainable living.
When she isn’t blogging about her adventures she is writing and giving relationship advice. Her soon-to-be-open blog will feature thought-provoking philosophies and her journey to finding true happiness.
She is married to the love of her life, a survivalist, and they spend most of their time gardening in their off-grid home. The remainder of their time is spent keeping up with their active son.






Leave a Reply